Table of Contents
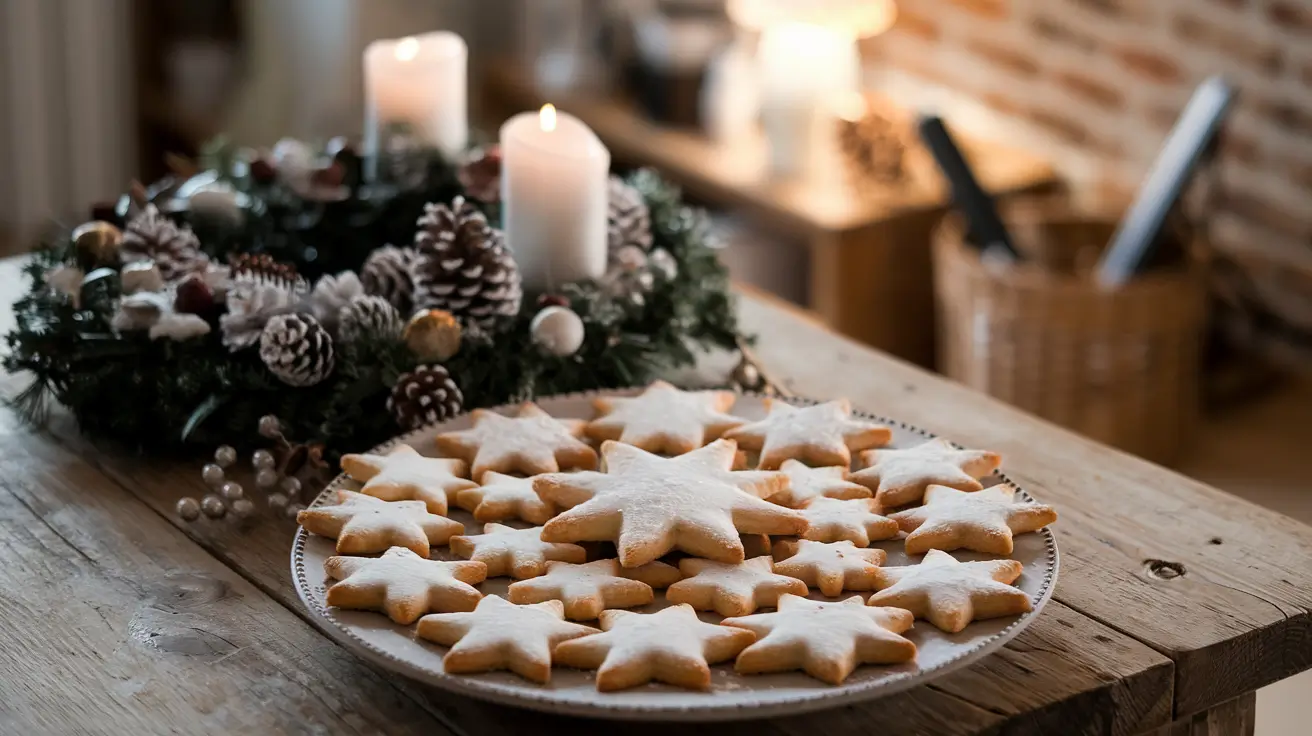
Star cookies are charming, star-shaped confections that truly capture the essence of festive celebrations. Moreover, these cookies are as versatile as they are beautiful, with recipes ranging from buttery shortbread to spiced creations. Additionally, they’re often decorated with colorful icings, glittery sprinkles, or delicate powdered sugar, which makes them both a visual and culinary delight.
Furthermore, from the crisp crunch of traditional star-shaped cookies to the chewy sweetness of jam-filled variations, these treats have found their way into kitchens and hearts worldwide. Not only are they crowd-pleasers, but their distinctive shape also adds a touch of magic to any occasion.
Historical Background
The origins of star cookies stretch back centuries, with variations emerging across cultures. German Zimtsterne, or cinnamon stars, are among the oldest examples, baked during the holidays to symbolize hope and joy. Finnish joulutorttu, another notable version, brings a pastry-style twist filled with rich jam.
As baking traditions spread, these cookies evolved into countless modern variations, influenced by regional flavors and creative touches. Today, star cookies are a staple in festive baking, representing warmth, togetherness, and celebration.
Types of Star Cookies
Traditional Star Cookies
Star cookies have a rich history, which is deeply rooted in traditional recipes that have been cherished for generations. Moreover, these time-honored confections beautifully showcase the simplicity of baking. In addition, they emphasize classic ingredients and techniques that not only reflect cultural significance but also bring timeless flavors to the table.
Zimtsterne (Cinnamon Stars)
A quintessential German treat, Zimtsterne or cinnamon stars, have been delighting families for centuries. Made with almond flour, sugar, and cinnamon, these chewy cookies are topped with a glossy royal icing and baked to perfection. Originating in Germany, they are a staple during Christmas festivities, symbolizing warmth and holiday cheer. Their nutty aroma and spiced sweetness make them unforgettable additions to any dessert spread.
Finnish Joulutorttu (Christmas Stars)
Joulutorttu, Finland’s beloved star-shaped pastries, combine buttery puff pastry with sweet prune jam. These intricate cookies are folded into star-like shapes before being baked until golden and flaky. Traditionally served during Christmas, their delicate layers and fruity filling have made them an enduring symbol of Finnish holiday traditions. This pastry is a must-try for anyone wanting to explore Nordic flavors.
Modern Variations
Modern interpretations of star cookies seamlessly blend creativity with convenience, ultimately resulting in exciting new flavors and textures. Furthermore, these variations make use of innovative ingredients and techniques, demonstrating that even a classic cookie can continue to evolve over time.
Raspberry Star Cookies
Raspberry star cookies are a delightful modern twist, as they are filled with vibrant raspberry jam for a burst of fruity flavor. Typically, these cookies feature a shortbread or sugar cookie base, with the jam serving as a tangy complement to their buttery sweetness. Moreover, they are perfect for summer parties or festive gatherings, as they beautifully showcase the versatility of star-shaped cookies in adapting to different occasions.
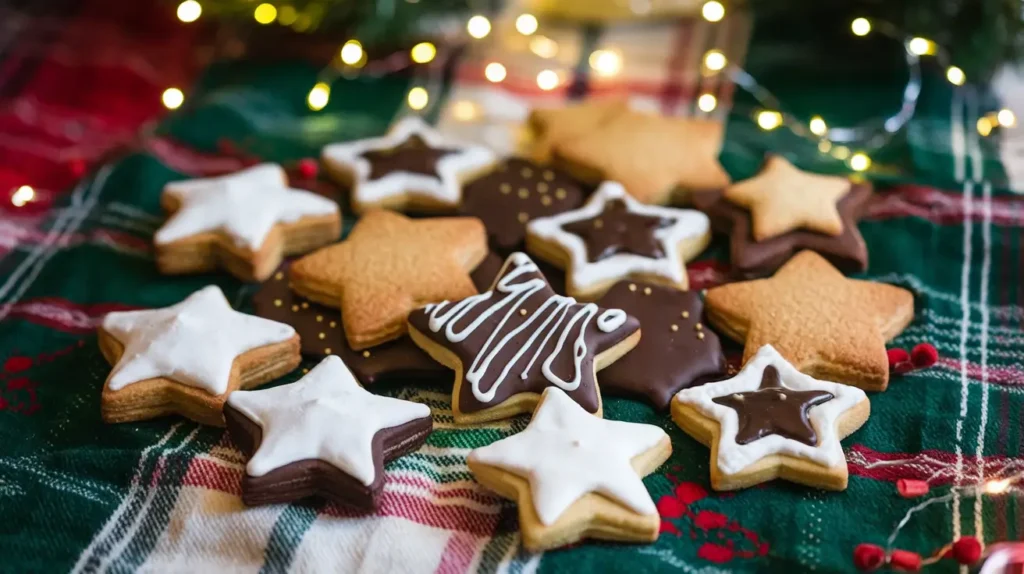
Chocolate Star Cookies
Chocolate lovers will adore these decadent variations, where rich cocoa powder or melted chocolate is infused into the dough. These star cookies can also feature drizzled chocolate, colorful sprinkles, or creamy ganache fillings for added indulgence. Perfect for those seeking a luxurious treat, they’re sure to impress.
Cultural Variations
The universal appeal of star cookies has led to their adaptation in diverse culinary traditions, showcasing unique regional influences.
American Star Cookies
In the United States, star cookies are a festive favorite, especially during national holidays like the Fourth of July. These cookies are often decorated in patriotic colors—red, white, and blue icing—to reflect the theme of celebration. From simple sugar cookies to elaborately decorated designs, American star cookies are as diverse as the country itself.
Other International Variants
From Scandinavian countries to Eastern Europe, star-shaped cookies have inspired bakers worldwide. In Italy, for instance, star-shaped biscotti are sometimes dipped in chocolate or paired with espresso. Meanwhile, Polish and Czech bakers incorporate star cookies into their traditional holiday platters, adding spices like nutmeg or cardamom to suit local tastes. Each variant tells a story of creativity and culture.
Simple Ingredients for Star Cookies
(Makes about 20–24 cookies)
For the Dough:
- 2 ½ cups all-purpose flour (or gluten-free flour for a gluten-free option)
- 1 cup unsalted butter (softened at room temperature)
- ¾ cup granulated sugar
- 1 large egg
- 1 teaspoon vanilla extract
- ½ teaspoon baking powder
- ¼ teaspoon salt
For Decorating (Optional):
- 1 cup powdered sugar (for icing)
- 2–3 tablespoons milk or lemon juice (to mix with powdered sugar for icing)
- Food coloring (optional, for colored icing)
- Sprinkles, edible glitter, or colored sugar (for decoration)
Simple Equipment for Star Cookies
- Mixing Bowl – For combining ingredients.
- Electric Mixer or Whisk – To cream the butter and sugar.
- Rolling Pin – For rolling out the dough.
- Star-Shaped Cookie Cutters – Available in various sizes.
- Baking Sheet – For baking the cookies.
- Parchment Paper – To line the baking sheet and prevent sticking.
- Cooling Rack – To cool the cookies after baking.
- Spatula or Butter Knife – For mixing and spreading icing.
- Piping Bag or Ziplock Bag (optional) – For detailed icing designs.
Simplified Steps to Make Star Cookies
- Make the Dough:
- In a mixing bowl, cream together the softened butter and sugar until light and fluffy.
- Add the egg and vanilla extract, and mix until combined.
- In a separate bowl, whisk together the flour, baking powder, and salt. Gradually add this to the butter mixture, mixing until a smooth dough forms.
- Chill the Dough:
- Wrap the dough in plastic wrap and refrigerate for at least 30 minutes.
- Cut Out the Stars:
- Preheat your oven to 350°F (175°C).
- Roll out the dough on a floured surface to about ¼-inch thickness.
- Use star-shaped cookie cutters to cut out the cookies.
- Bake the Cookies:
- Place the cookies on a parchment-lined baking sheet, spacing them about 1 inch apart.
- Bake for 8–10 minutes, or until the edges are lightly golden.
- Cool and Decorate:
- Let the cookies cool on the baking sheet for 5 minutes, then transfer them to a cooling rack.
- Once completely cool, decorate with icing, sprinkles, or edible glitter as desired.
Tips for Success
Store cookies in an airtight container for up to a week.
If the dough is too sticky, add a little more flour. If it’s too dry, add a teaspoon of milk.
For easy icing, mix powdered sugar with milk or lemon juice until smooth. Add food coloring if desired.
Step-by-Step Recipe Guide
Preparing the Dough
The first and most crucial step in crafting star cookies is preparing the dough. The right consistency ensures that your cookies hold their star shape while baking and remain tender and flavorful.
- Mix the Dry Ingredients: Combine the flour, baking powder, and a pinch of salt in a bowl. This creates the structural base for your cookies.
- Cream Butter and Sugar: In a separate mixing bowl, cream together softened butter and sugar until light and fluffy. This step is essential for achieving a tender crumb.
- Incorporate Flavors: Add vanilla extract, almond extract, or a spice like cinnamon to enhance the dough’s flavor. For festive flair, you can even mix in finely grated citrus zest.
- Combine Wet and Dry: Gradually incorporate the dry ingredients into the wet mixture, blending until a smooth dough forms.
- Chill the Dough: Wrap the dough in plastic wrap and refrigerate it for at least an hour. Chilling prevents spreading during baking, ensuring your stars maintain their shape.
Cutting and Baking the Cookies
Shaping and baking are where your star cookies begin to shine—literally and figuratively! Precision and attention to detail will yield visually stunning results.
- Roll Out the Dough: On a lightly floured surface, roll the dough to about 1/4-inch thickness. Ensure the dough remains even to avoid overcooked edges and undercooked centers.
- Cut Out Stars: Use your star-shaped cookie cutters to cut the dough into stars. Dip the cutters in flour if they start sticking to the dough.
- Arrange on Baking Sheet: Line a baking sheet with parchment paper and place the stars about an inch apart to allow for even baking.
- Bake to Perfection: Bake in a preheated oven at 350°F (175°C) for 8–10 minutes, or until the edges are lightly golden. Avoid overbaking to maintain a soft, tender texture.
- Cool Completely: Let the cookies cool on the baking sheet for a few minutes before transferring them to a wire rack.
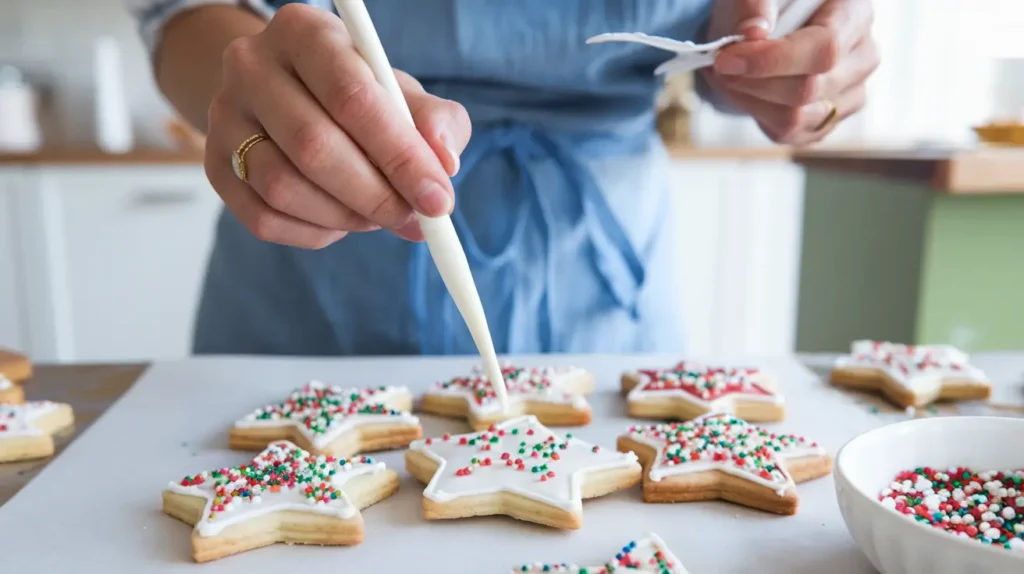
Decorating the Cookies
Decorating transforms your star cookies into edible works of art. Whether you prefer a minimalist approach or intricate designs, this step is where creativity takes center stage.
- Prepare Icing or Glaze: Mix powdered sugar with a small amount of milk or lemon juice to create a smooth glaze. For royal icing, use egg whites for a firmer finish.
- Add Colors: Divide the icing into bowls and tint each with food coloring to match your theme. Pastel colors are great for spring, while bold reds and greens suit Christmas.
- Decorate with Precision: Use piping bags with small tips for fine details or spread icing with an offset spatula for a simple finish. Add sprinkles, edible glitter, or sugar pearls for extra sparkle.
- Let Set: Allow the decorations to dry completely before storing the cookies to prevent smudging.
Decorating and Serving Suggestions
Decorating and presenting star cookies can transform these humble treats into eye-catching, festive delights. Whether you’re preparing for a holiday party, a special event, or simply sharing with loved ones, thoughtful decoration and presentation elevate the experience. Let your creativity shine with these decorating techniques and serving suggestions.
Icing Techniques
Adding icing to star cookies not only enhances their flavor but also gives them a polished, professional look. With a few basic tools and a little practice, you can create stunning designs that match any theme.
Royal Icing Application
Royal icing is the go-to choice for intricate designs and a smooth, glossy finish. Here’s how to apply it effectively:
- Prepare the Icing: Combine powdered sugar, egg whites (or meringue powder), and a splash of water until smooth and pipeable. Adjust the consistency by adding more sugar for thicker icing or water for thinner.
- Outline and Flood: Pipe an outline around the edges of the cookie using a piping bag with a fine tip. Once the outline sets, “flood” the center with thinner icing, using a toothpick to spread it evenly.
- Add Details: After the base layer dries, use contrasting colors for intricate details like swirls, dots, or stars. Let each layer dry completely to prevent smudging.
Using Sprinkles and Edible Glitter
Sprinkles and edible glitter add texture, color, and a festive sparkle to star cookies. Here’s how to use them effectively:
- Apply While Wet: Sprinkle decorations over wet icing to ensure they stick. For more precise placement, use tweezers or your fingertips.
- Experiment with Textures: Mix and match textures like coarse sugar, nonpareils, and metallic dragees for a dynamic look.
- Focus on Themes: Choose colors and styles that fit your theme, such as gold and silver for New Year’s or red and green for Christmas.
Presentation Ideas
How you serve or gift star cookies can make them even more memorable. These presentation tips ensure your cookies are the star of the show.
Festive Platters
Arrange star cookies on decorative platters to create an eye-catching display.
- Layer for Dimension: Use tiered platters to showcase cookies at different heights.
- Add Seasonal Elements: Surround the cookies with sprigs of pine, dried citrus slices, or fairy lights for a holiday vibe.
- Group by Design: Arrange cookies with similar designs together for a cohesive look.
Gifting Star Cookies
Star cookies make excellent gifts, and thoughtful packaging adds a personal touch. Here’s how to wrap them beautifully:
- Use Clear Bags or Boxes: Showcase the cookies with clear cellophane bags or transparent boxes, tied with colorful ribbons.
- Include Personal Notes: Attach a handwritten note or recipe card to make the gift more personal.
- Decorative Containers: Use festive tins or jars lined with parchment paper to keep cookies fresh and stylish.
Frequently Asked Questions (FAQs)
How do I prevent my star cookies from spreading during baking?
To keep star cookies crisp and perfectly shaped, ensure the dough is thoroughly chilled before rolling and cutting. Overmixing the dough can also cause spreading, so mix ingredients just until combined. Lastly, bake cookies on a cool baking sheet lined with parchment paper to maintain their structure.
Can I freeze star cookie dough for later use?
Absolutely! Shape the dough into a disc, wrap it tightly in plastic wrap, and store it in an airtight freezer bag. Dough can be frozen for up to 3 months. Thaw in the refrigerator overnight before rolling and cutting to ensure the best texture and flavor.
What alternatives can I use for gluten-free star cookies?
For a gluten-free version, replace all-purpose flour with a 1:1 gluten-free baking mix. Almond flour is another excellent option, especially for recipes like Zimtsterne. Be sure to check that other ingredients, such as baking powder, are also certified gluten-free.
How long can I store decorated star cookies?
Decorated star cookies can be stored in an airtight container at room temperature for up to one week. For longer storage, refrigerate them for up to two weeks or freeze for up to three months. Place parchment paper between layers to protect the decorations.
Conclusion and Final Thoughts
Star cookies are much more than just a dessert—they’re a blend of artistry, tradition, and joy that bring people together during celebrations and everyday moments. From the rich heritage of traditional star cookies like Zimtsterne and Joulutorttu to modern innovations like chocolate and raspberry-filled stars, these cookies are as diverse as the cultures they represent.
By mastering techniques such as precise dough preparation, creative icing designs, and thoughtful presentation, you can transform these delightful treats into edible masterpieces. Whether you’re baking for family, gifting friends, or adding sparkle to a festive spread, star cookies always shine as a centerpiece.
Finally, remember that baking is about experimentation and fun. Don’t hesitate to explore new flavors, toppings, or even crafting your unique variation of star cookies. Each batch is an opportunity to create cherished memories and share the magic of these iconic treats. So, roll out the dough, grab your star cutters, and let your creativity take flight—because every cookie you bake is a star in its own right!